

If you’ve spent any time in fly fishing circles, you’ve probably heard someone dismiss Euro nymphing as something less than “real” fly fishing. Maybe you’ve heard it from a purist standing on the bank, arms crossed, waiting for a hatch that might not come. Maybe you’ve felt it yourself, some hesitation about whether learning this style means giving something up.
Let’s clear that up right now. Euro nymphing is fly fishing.
This guide isn’t meant to turn you into a “euro nympher.” That label doesn’t matter much to me, and it shouldn’t matter much to you either. The goal is to help you become an angler who can confidently approach any river with a full set of tactics, someone who isn’t limited to one style because the conditions on a given day happen to favor something else.
I’ll take the first opportunity I get to throw a dry fly. Nothing beats watching a trout rise and eat something off the surface. But those opportunities don’t always show up. Hatches are unpredictable. Water conditions change. Fish don’t always cooperate with what we’d prefer to be doing. While purists stand on the bank waiting for something to happen, tightline nymphing lets you create your own opportunities.
Here’s an argument I’ll make and stand behind: tightline nymphing is a more technical skill than dry fly fishing. When a trout rises to a dry fly, it shows you exactly where it is and exactly when it ate. Tightline nymphing asks you to find fish you can’t see, read the water instead of a rise, and detect a strike that might only show up as a slight pause in your sighter. There’s nothing lesser about that. If anything, it demands more from you as an angler.
This article is a complete guide and a reference you can come back to as you work through adding this skill. I’m going to walk you through a progression, the same one I went through myself, along with links to deeper articles on each step so you can dig in wherever you need to. There’s no finish line here. This isn’t a checklist you complete once and move on from. It’s a continuum, and where you stop on it is entirely up to you.
A Quick Word on Terms: Tightline Nymphing vs. Euro Nymphing
Before we go any further, I want to clear up some confusion that trips up a lot of anglers.
“Euro nymphing” is the term that’s taken over the fly fishing world, thanks to the fly fishing industry and the rise of competitive angling. But Euro nymphing is really just one specific, more refined style within a much broader category: tightline nymphing.
Think of tightline nymphing as the umbrella. It’s a system for presenting nymphs to trout without an indicator, using a sighter built into your leader for strike detection, and staying in direct contact with your flies throughout the drift. Under that umbrella, you’ll find several styles: Czech nymphing, Polish nymphing, and yes, Euro nymphing, which developed largely because of competition rules. Those rules prohibit any added weight on the leader (no split shot) and require leaders under a certain length.
Here’s the part that matters most for you as a recreational angler: you don’t have to follow competition rules. You’re not fishing for a medal. If you want to pinch on a split shot because the water calls for it, do it. If you want to run an indicator on a heavier nymph rig from time to time, that’s fine too. Ignore the anglers online who insist there’s only one “correct” way to do this. Some people call them the Euro Police, and they mostly exist in Facebook comment sections. You don’t need their approval, and you don’t need to follow their rules to be effective on the water.
What you do need to focus on is the core skill: learning to drift weighted nymphs naturally and detect strikes by staying in contact with your flies through a sighter. Everything else, the specific leader formula, the amount of weight, the number of flies, is a detail you can adjust as you go.

Who This Guide Is For (and Who It Isn’t)
I want to be upfront about something. If you are brand new to fly fishing and haven’t yet learned to cast a traditional floating fly line, I don’t recommend starting here.
That’s not a hard rule. It’s not impossible to begin your fly fishing life with a tightline setup, especially if you already have a bait fishing background. There’s a real overlap between the two. In fact, my own foundation in tightline nymphing traces back to fishing corn with my dad long before I ever picked up a fly rod. He taught me to use light line, adjust weight for water speed and depth, and feel for a strike, which turned out to be the exact same fundamentals that make tightline nymphing work. If that sounds like your background, you may find this transition comes more naturally than you’d expect.
But for most anglers, I still recommend learning to cast a traditional fly line first. There are fundamentals you pick up there, timing, line management, reading water for where fish hold, that will make everything in this guide come together faster and with less frustration. You’re not locked out of tightline nymphing if you skip that step. You’ll just be building two new skill sets at once instead of one, and that’s a harder road for most people.
If you already have some traditional fly fishing under your belt and you’re ready to add euro nymphing to your arsenal, keep reading. This guide is for you.
Step 1: Learn Tightline Contact With the Gear You Already Own
Here’s the good news. Your first step into euro nymphing doesn’t require you to buy anything.
The foundational skill in all of this is tightline contact: staying connected to your flies through the leader well enough to feel and see how they’re drifting, without so much tension that you drag them unnaturally through the water. I’ve written a full breakdown of this concept, but here’s the short version: you control that contact through three variables: angle, elevation, and distance.
Angle refers to how your sighter sits relative to the water. The more vertical it is, the better your drift usually is, assuming your flies are actually in the strike zone.
Elevation is how high you’re holding your rod tip, and by extension, how much leader you’re keeping off the water. Most anglers instinctively lower their rod tip when they think their flies aren’t deep enough. In my experience, that’s almost always the wrong move. Raising the rod tip lightens tension, smooths out your drift, and helps pull your flies up into the strike zone instead of plowing the bottom.
Distance might be the most overlooked variable. Tightline nymphing is a close-range technique. The farther you cast, the more slack you introduce and the less control you have. If you feel like you’re fighting your drift, the first question to ask is whether you’re simply too far from your target.
I learned the elevation lesson the hard way, and it’s a story worth sharing because it illustrates the whole concept well. I once tied on a mop fly during a slightly off-color day, mostly because I wanted something I could actually see drifting in the water. What I discovered wasn’t how visible the fly was to the fish. It was how visible it was to me. Watching that fly drift showed me that I’d been letting my sighter sit too close to the surface the whole time, which meant my fly was bouncing along the bottom far more than I realized. Once I raised my sighter higher out of the water than felt natural, the bounce stopped, the fly began to glide, and the takes increased. That single adjustment changed how I fished from then on.
Once you understand these three controls, you’ll start to notice specific signs that your drift is actually working. You’ll feel fewer ticks on the bottom. You’ll lose fewer flies to snags. Your sighter will spend more time above the surface instead of getting dunked. And soft takes, the kind that used to go completely unnoticed, will start standing out because your drift is finally clean enough to see them.
You can start practicing all of this on your existing rod. Build a basic leader by clipping a standard 9-foot 4X tapered leader around the 0X mark, adding about 20 inches of sighter material, tying on a tippet ring, and attaching a fluorocarbon tippet with a clinch knot. George Daniel popularized this exact formula, and it’s still one of the simplest ways to get started. I go through the full setup here, including how to adjust your casting stroke and read your sighter for the first time.
This is the part of the process I want you to feel most confident about. You can make these changes tonight and be fishing them tomorrow. No specialized rod. No new reel. No fly line replacement. Just a leader modification and a shift in how you think about angle, elevation, and distance.
Step 2: Build a Mono Rig for Euro Nymphing
Once you’ve spent some time getting comfortable with tightline contact on a basic leader, the next logical step is building a mono rig.
I point anglers toward the Troutbitten Standard Mono Rig specifically, developed by Domenick Swentosky, for a couple of reasons. First, it’s incredibly versatile. Because it has very little mass compared to a traditional fly line, it reduces drag and lets heavily weighted flies drift more naturally. But it’s not a one-trick tool. You can still cast dry flies, dry droppers, and streamers on a mono rig, which makes it a genuinely useful bridge as you’re transitioning away from a traditional floating line rather than a piece of gear that locks you into nymphing only.
Second, there’s an enormous amount of instructional material out there on building and fishing this exact leader. That matters. When you get stuck, you’re not on your own trying to reverse engineer a niche system. I’ve put together a full step-by-step tutorial for building the mono rig, including the specific materials: a 20-pound Maxima Chameleon butt section, a 12-pound Amnesia transition, a two-part sighter, tippet rings, and fluorocarbon tippet from 3X to 6X.

Building your own leader might feel intimidating the first time you try it, but it’s a small handful of knots and measurements. You’re really just connecting a handful of sections, each one serving a specific purpose, with a couple of knot types you’ll use over and over. A 20-pound butt section gives you enough mass to cast comfortably; a lighter transition section continues the taper and improves accuracy; a two-part sighter gives you a visible window into your drift; and tippet rings on either end let you swap tippet length and diameter in seconds without retying the whole leader.
Once you’ve built one, you’ll understand exactly why each section is there, and you’ll be able to adjust the formula as your own preferences develop. Some anglers prefer a thinner butt section once they’ve gained experience. That’s a refinement worth exploring later, not a starting point.
Build the Trout Bitten Mono Rig Leader
The materials below are used to build the Troutbitten Standard Mono Rig Leader. While many mono rig formulas exist, materials and diameters can vary depending on the leader you’re building. If you’re just getting started, this is an excellent place to begin before experimenting with other leader formulas.

The Butt Section

Transition Material

Upper Sighter

Lower Sighter
The Mindset Shift: Weight in the Fly, Not Just the Leader
Somewhere around this point in the progression, a real shift starts to happen in how you think about getting your flies down to the fish.
When most anglers start out, their instinct is to add weight to the leader itself, split shot pinched on above the flies. There’s nothing wrong with that. I still use split shot situationally, and you should feel free to do the same. But the more effective long-term habit to build is shifting that weight into the flies themselves.
Here’s why it matters. Weighted nymphs, typically built with tungsten beads on jig hooks, cut through the water column more efficiently and get you into direct contact with the flies rather than a chunk of shot sitting somewhere on your leader. That direct contact is what lets you feel subtle takes and make small adjustments to your drift on the fly. Split shot adds weight, but it also adds a disconnect between you and your flies.
The practical move here is to build or buy a selection of nymphs tied with a range of bead sizes, something like 2.4mm, 2.8mm, and 3.2mm tungsten beads, so you can adjust for water speed and depth by changing flies instead of fiddling with split shot placement. I generally think of it in terms of small, medium, and large, with an occasional extra-small or extra-large for unusual conditions. The pattern matters far less than most anglers assume. What matters is having the right weight in front of the fish.

Building Out Your Euro Nymphing Rig: Fly Selection and Tandem Rigs
If you’re just starting to add weighted flies into your system, my advice is to start simple. Pick a small handful of proven patterns, something like a Walt’s Worm or a Frenchie, tied in a few different weights, and fish those confidently rather than constantly second-guessing your pattern choice. I break down this exact approach in more detail here. Trout care far more about how a fly is drifting than what it’s supposed to represent.
Start with a single fly. Get comfortable presenting one nymph naturally before you complicate things. Once that feels solid, you’re ready to add a second fly and start fishing a tandem rig.
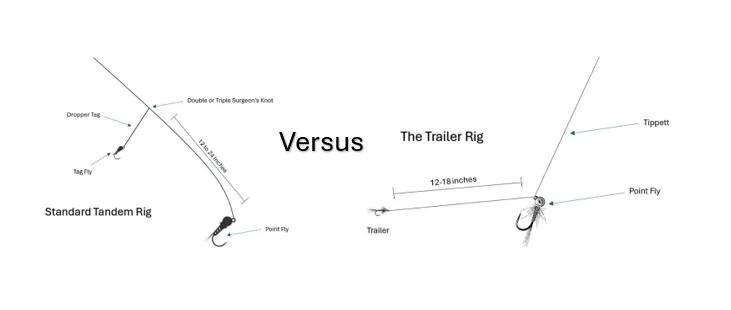
A tandem rig lets you cover the water column in two ways at once. In a standard tandem rig, a heavier point fly rides down in the strike zone while a lighter tag fly sits 12 to 18 inches higher, giving trout two options at two depths. This works especially well during a hatch, when fish are feeding at multiple levels of the water column. In colder months, when trout hold tighter to the bottom, a trailer rig, with two flies both fished near the streambed, often outperforms the standard setup. I go into much more depth on both rig styles, along with my favorite fly combinations for each, in this article.
A few combinations have earned a permanent place in my own rotation. For an all-around setup, I like a heavier point fly paired with a smaller, lighter fly on the tag, something that lets me cover two zones of the water column without overthinking it. In high water, I’ll swap the light tag fly for a second heavy pattern instead, doubling down on weight so both flies can cut through faster current and reach fish holding tight to the bottom. And in low, clear conditions, I’ll go the opposite direction, running two lighter flies for a subtler presentation that won’t spook wary trout.
For a trailer rig in cold water, I lean on what I call the Show and the Dough, a bright, flashy attractor fly followed by 12 to 18 inches of tippet leading to something small and realistic, like a zebra midge or a pheasant tail. The bright fly pulls trout in from a distance. The smaller fly gives them something believable to actually eat once they get close.
Don’t feel like you need to run two flies from day one. There’s real value in mastering a single fly presentation first. But once you’ve got that down, a tandem rig is one of the simplest ways to put more options in front of more fish.
A Small Upgrade That Makes a Real Difference: Fluorocarbon
Somewhere in this progression, you’ll likely notice your tippet wearing out faster than you’d like, or you’ll hear other euro nymphing anglers talking about fluorocarbon like it’s a secret weapon.
Here’s the honest case for it. Fluorocarbon is more durable than nylon; it resists nicks and abrasion better, and its denser profile gives you a truer connection to your flies. It also sinks faster than nylon, which matters more than you’d think once you’re fishing lighter tippet and smaller flies.
The sticker shock at the fly shop is real, though. My advice is to start affordable. Seaguar fluorocarbon, which isn’t marketed specifically for fly fishing but works just fine for this purpose, gives you durability and sink-rate benefits at a fraction of the cost of premium fly shop brands like TroutHunter. You can always move up to the premium stuff later if you decide the difference is worth it. There’s no need to make that jump on day one.
Fluorocarbon Tippet
Fluorocarbon has become my go-to tippet material for euro nymphing and other tightline techniques. While it’s more expensive than nylon, it’s also more durable, sinks faster, and provides a more direct connection to your flies. After making the switch, I spent less time replacing worn tippet and more time fishing. ARTICLE: It’s Time to Switch to Fluorocarbon

Premium choice 1

Premium choice 2

best value
Step 3: When a Specialized Euro Nymphing Rod Actually Earns Its Place
At this point in the progression, some anglers start eyeing a specialized rod, something in the 10 to 11 foot range, built as a 2 or 3 weight, with a sturdy butt section and a light, sensitive tip.
I fish one myself, a 10-foot 3-weight, and I genuinely love it. But I want to be honest about the timing here. I don’t think a specialized rod is the right move early in this journey, and I think buying one too soon can actually work against you.
A dedicated euro rod feels completely different from a traditional fly rod. The casting stroke, the flex, the way it loads- none of it resembles what you’re used to. If you jump straight to that gear before you understand why it’s built the way it is, you’re learning two things at once: tightline nymphing itself and an unfamiliar tool, which makes the whole process harder than it needs to be.
I genuinely value my euro rod because I learned to tightline nymph first on a traditional rod. By the time I picked up a specialized rod, I understood exactly what problem it was solving. The extra length gave me more reach and better line control at distance. The lighter tip gave me more sensitivity for detecting subtle takes. None of that would have meant much to me if I’d started there. I would have just been fighting an unfamiliar rod without understanding what it was doing for me.
There’s also a practical downside to going all in too early. A specialized nymphing rod isn’t great for throwing dry flies or handling a surprise hatch. If you’ve only got one rod and it’s built entirely around nymphing, you’ll find yourself limited exactly when versatility matters most.
Take your time here. Let the mono rig on your current setup do the work while you build genuine proficiency. When you eventually pick up a euro rod, you’ll actually feel the difference it makes, instead of just fighting a rod that feels foreign.

Step 4: Micro Leaders and the Ongoing Refinement
Somewhere further down this road, you might start hearing other euro nymphing anglers talk about micro leaders, thinner-coated monofilament like Sempé or Baetis that lets you turn over a single light fly at real distance without the mass of a standard mono rig butt section.
I want to be direct about this one. A micro leader is not where you start, and it’s not a required destination either. I wrote an entire article about my own experience adopting one, and the short version is this: it’s not better than a standard mono rig; it’s different, and it only earns its place once you already understand why it’s working.
I picked up a micro leader after hitting a specific limitation on a low, clear river, where I needed to cast farther with lighter flies than my standard 20-pound butt section could comfortably turn over. The micro leader solved that problem beautifully. Two weeks later, on a big, windy river needing heavier flies, that same leader was the wrong tool entirely. That’s really the whole lesson. It’s situational, not universal, and it’s most effective in the hands of someone who’s already gone through the progression, not someone who skipped straight to it.
I still fish my standard mono rig constantly, and I don’t expect that to change. The micro leader hasn’t replaced it. It’s opened up water and presentations I couldn’t touch before, but only because I’d already put in the time to understand the fundamentals it’s built on.
This is really the theme of the entire back half of this progression. There’s no final piece of gear waiting at the end that makes you a “real” tightline angler. It’s an ongoing refinement, and how far you take it is entirely up to you.

Ignore the Rules That Don’t Apply to You
I mentioned this earlier, but it’s worth repeating on its own, because I see it trip up new anglers constantly.
Competition nymphing rules exist for competition. They’re not a code of ethics for recreational fishing. If you’re not fishing in a sanctioned event, you are not bound by a prohibition on split shot, or a minimum leader length, or any of the other technical requirements that define competitive Euro nymphing. Use an indicator if the water calls for it. Pinch on a split shot when you need to get down fast. Fish two flies, three flies, whatever gets you into fish.
The anglers who police these “rules” in Facebook groups aren’t the ones who are going to net your trout. Focus on the core skill, staying in contact with your flies and reading your sighter, and let the details flex to whatever the day in front of you actually requires.
Common Mistakes New Euro Nymphing Anglers Make
As you move through this progression, a few mistakes tend to show up again and again. I’ve made most of them myself. Buying specialized gear too early. Getting hung up on rules and labels. Ignoring your casting stroke. Fishing the same flies out of habit. Expecting instant results.
I break all five down in detail here, including why each one holds anglers back and how to fix it.
Give yourself permission to be a beginner at this for a while. The learning curve is part of what makes it rewarding once things click.
Where to Go From Here
If you’ve made it this far, here’s a quick recap of the progression:
- Learn tightline contact with the gear you already own.
- Build and fish a mono rig.
- Shift your mindset from weight on the leader to weight in the fly.
- Add a second fly and learn tandem rigs.
- Upgrade to fluorocarbon tippet, starting with affordable options.
- Consider a specialized euro rod once you understand what problem it’s solving.
- Explore a micro leader if and when a specific situation calls for it.
I want to leave you with the same thought I keep coming back to myself. I don’t know exactly where my own progression goes next, and I don’t think you need to know either. This isn’t a ladder you’re required to climb to the top of. You can stop at a basic leader on your traditional rod and be a genuinely excellent nymphing angler for the rest of your life. Or you can keep refining, one season at a time, the way I have.
Either way, you’re not becoming a “euro nympher.” Euro nymphing is simply one more tool. You’re becoming a more complete angler, one who can walk up to any river, in any condition, and put a fly in front of a trout that’s actually going to eat it.
Bookmark this page. Come back to it as you move through each step. And get out there and put it to work.
Spend more time on the water.
Jeff Smecker, Founder, TroutStrike Fly Fishing, LLC

Join the Conversation
Where are you in the Euro Nymphing learning progression?

Thanks for reading, and I hope this article helps you catch a few more trout.
Spend more time on the water.
Jeff Smecker
Founder, TroutStrike Fly Fishing, LLC

©TroutStrike Fly Fishing, LLC


Leave a Reply